- Topic ID: id_17479349
- Version: 1.0
- Date: Aug 28, 2018 3:54:42 PM
HP Gantry Belt Tightening Procedure
Prerequisites
Overview
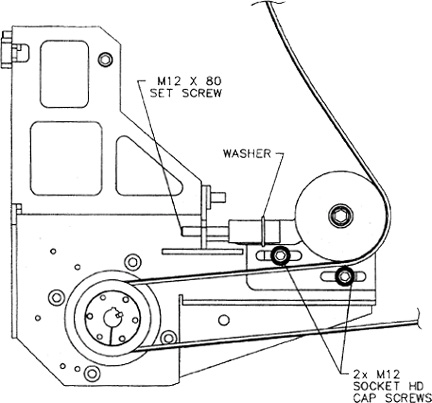
Refer to Figure 1 for this procedure.
Figure 1. HP Gantry Belt
Procedure
 danger
- warning
- Locate the LOTO equipment and lock out the A1 breaker. Lock the gantry to prevent gantry rotation.
- Remove the Gantry sides, and rear cover. Follower the cover removal procedures found in the installation manual book 1 appendix.
- You may need to remove the bottom slip ring cover, as well as the side safety cover on the bottom left to gain access to the belt assembly.
- After you have gained access to the belt assembly, loosen the 2 -M12 socket head cap screws just enough to allow the pulley assembly to slide freely- left to right.
- Tighten the M12 set screw until the flat washer no longer spins freely.
- Then, loosen the M12 set screw just enough that the flat washer spins with some resistance.
- Release gantry rotation lock and carefully rotate the gantry clockwise by hand several times to ensure that the belt is tracking properly and that the tension is correct. ( the washer spins with some resistance) This may require several times for the belt to stretch and seat.
- When finished, tighten the 2- M 12 socket head cap screws to the recommended torque value of 50 ft lb.
- Check that the gantry rotation lock is released and replace all removed covers and guards security. Follow all torque recommendations.
- Remove the LOTO device and power on the system. Run test scans to determine if the gantry belt tension is set correctly without errors.
Finalization
No finalization steps.