- Topic ID: id_16158124
- Version: 1.0
- Date: Jul 7, 2018 4:28:56 PM
ESD Management and Device Handling
1 Electrostatic Discharge and Proper Device Handling
The circuit boards and disk drives for this system contain densely populated electronic components that are expensive and electrically sensitive. An electrostatic discharge (ESD) between 100 and 1000 V may damage a component. This is substantially less than the 3000 V discharge needed to feel any static. An ESD may cause an immediate failure, or it may weaken components to produce future, intermittent problems.
Always use the ESD strap pro-actively. Put circuit boards inside an anti-static bag or approved container before it is handled by a non-grounded person, moved from the grounded (ESD safe) area, or stored. Always place the board top side up on a flat surface when it is unmounted. Never handle the part outside its anti-static container unless the surrounding surfaces and you are grounded. Discharge the outside of the container before transferring the part.
2 ESD Management Process
2.1 ESD Management Tools
GEMS CT has evaluated current ESD process and recommends the following items be utilized to aid in the prevention of materials damage due to ESD events.
-
Anti-Static kit
-
Aero Duster Air Spray System Figure 5
-
Aero Duster Spray (Field Supplied) Figure 5
-
High Output Ionizing Fan Figure 6
-
ESD Smock Figure 4
-
Safe Skin Nitrile Gloves Figure 3
-
Amax Contact and Circuit Board Cleaner (Field Supplied)
-
ESD Flex Boots (4 and 8 Slice Detectors) Figure 2
-
Elastomer Tweezers (4 and 8 Slice Detectors) Figure 2
-
Elastomer Removal Pick (4 and 8 Slice Detectors)
-
Spare Elastomers w/container (4 and 8 Slice Detectors)
-
Alcohol Pads 91% (4 and 8 Slice Detectors)
-
16 Slice ESD Boots (16 Slice Detectors)
2.2 Process Differences
-
Nitrile Gloves replace Finger Cots.
-
Finger cots can leave black particles on surfaces.
-
Incorrect dressing of finger cots results in skin oils contamination.
-
-
Aero Duster Spray System replaces Metal Tube used for Canned Air.
Can spray angle is critical. No Liquid Spray allowed. New Aero Duster Spray System provides user the flexibility of access to components while the Aero Duster can remains upright.
-
High Output Ionizing Fan - Applies physics laws to dissipate charge on insulating materials.
2.3 ESD Tool Details
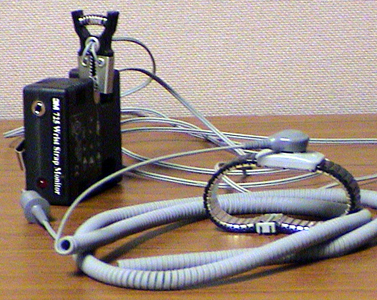
2.3.1 ESD Workstation Monitor and Wrist Strap
Figure 1. ESD Workstation Monitor and Wrist Strap
-
Monitor requires a 9 volt battery.
-
Monitor will “Beep” when you are not properly grounded.
-
Wrist strap must contact your skin. Do not place on top of clothing or Nitrile gloves.
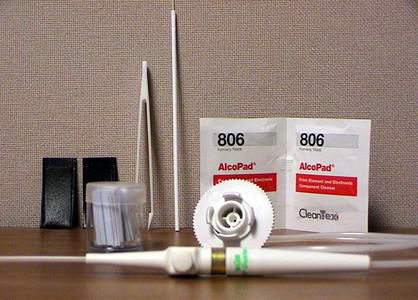
2.3.2 DAS/Detector Interface Tools
Figure 2. DAS/Detector Interface Tools
-
ESD Flex Boot Covers to protect detector from ESD damage
-
Alcohol wipes to clean flex leads prior to installation on the DAS/Detector Interface (DDIF).
-
Plastic tweezers and pick to remove and install elastomers.
-
Aero Duster attachment to remove debris from the DDIF assembly.
2.3.3 ESD Nitrile Glove
Figure 3. ESD Nitrile Glove
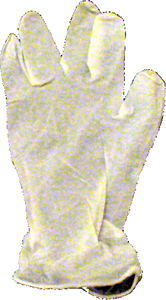
Use Nitrile gloves to prevent skin oil contamination. DO NOT use any other type of glove.
2.3.4 Full Length Smock
Figure 4. Full Length Smock
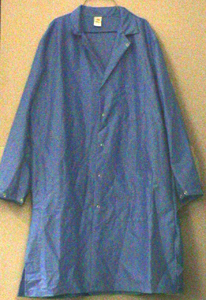
Use an ESD smock to prevent static discharge from your clothing. The wrist strap will not remove static charge from your clothing. The ESD smock will not remove charge from you clothing, it is a barrier to prevent ESD damage.
2.3.5 Aero Duster and Spray System Attachment
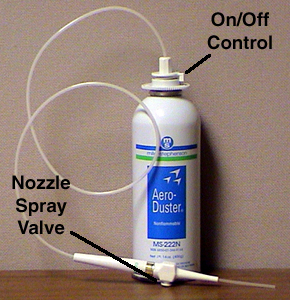
Figure 5. Aero Duster and Spray System Attachment
-
Remove the standard Aero Duster trigger.
-
Rotate Aero Duster Attachment to the OFF position.
-
Snap onto top of Aero Duster can. (Set attachment to OFF position before removal)
2.3.6 Ionizing Fan
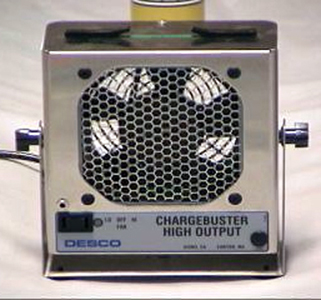
Figure 6. Ionizing Fan
3 Service ESD Tool Usage
 |
|
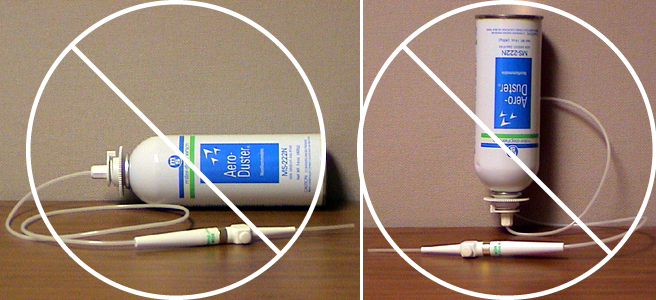
Figure 7. Wrong Angles will Generate Liquid Spray
-
Do not use Aero Duster Spray as shown in Figure 7. This will create a liquid stream which will charge the surface as it evaporates.
-
Always hold can upright as in Figure 5 and clear the hose attachment by spraying away from any surface. Do this to ensure no liquid is discharged.
-
Liquid discharge can be seen as a mist at the output of the nozzle and a frosting on surfaces.
-
You want to HEAR the spray, NOT see it.
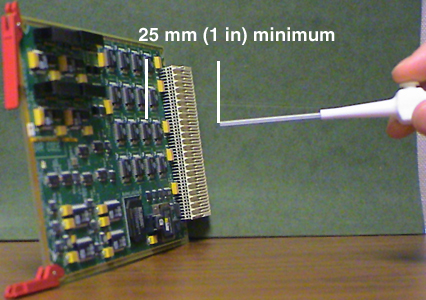
Figure 8. Incorrect Aero Duster Nozzle Use
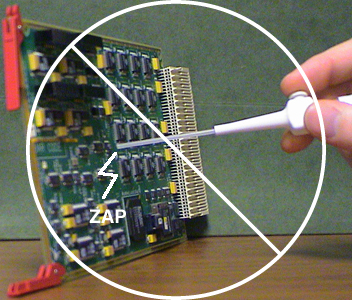
Figure 9. Proper Aero Duster Nozzle Use
-
Never touch the tip of the nozzle to any surface Figure 8. The tip can be charged in excess of 10,000 volts. This can result in severe ESD damage and/or microphonics noise.
-
Charge on the nozzle tip will not be transferred by the flow of gaseous spray. Maintain at least 25 mm or 1 inch from any surface.
-
Always clear the nozzle, away from surfaces, of any potential liquid spray.
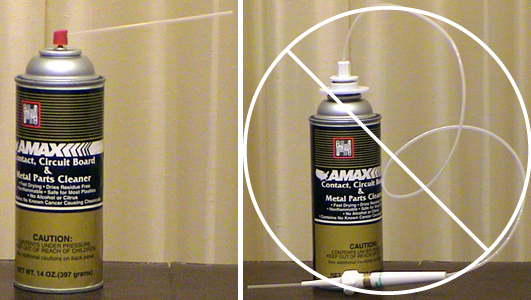
Figure 10. Amax Cleaner Correct and Incorrect Usage
-
Amax Contact and Circuit board cleaner can be used to dissipate static charge.
-
Amax Contact Cleaner should not be used on the elastomers. The elastomers will absorb the liquid preventing proper evaporation. The result will be microphonics noise and artifacts.
-
Do not attach the Aero Duster attachment to any other chemicals.
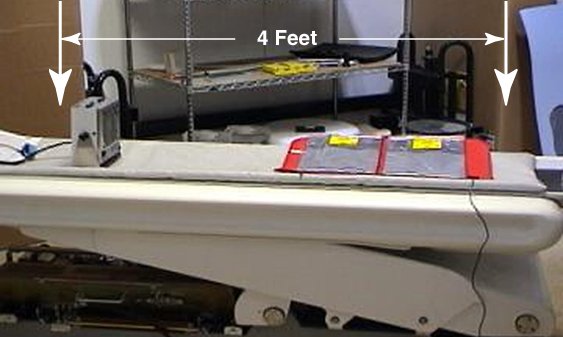
Figure 11. Preparing Your Work Area
-
Place the static mat near the end of the cradle Figure 11. Connect the ground lead to the Threaded Rod for the Gantry Balance Trim Weights on either side of the DAS.
-
Place the Ionizing Fan on the cradle blowing across the static mat. Set the fan speed to high. The effective coverage of the fan is less than 6 feet.
-
Use the table service outlet to power the Ionizing Fan.
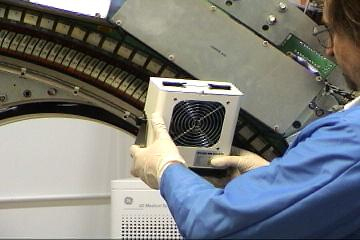
Figure 12. Using the Ionizing Fan to Dissipate Charge at the DDIF
-
The Ionizing Fan is to be used to dissipate built up charges.
-
It takes about six seconds for the fan to dissipate any charge.
-
Slowly direct the air flow from the fan across the affected area. Make several passes over the area.
-
There are no visual or physical indications to show effectiveness in this process.
-
The fan will be most useful when dealing with the detector and DAS, but can be used on other components as well.