- Topic ID: BJ_210401_Y01
- Version: 2.0
- Date: Dec 22, 2021 11:19:40 PM
Console (Z8G4_W10) Diagnostics (Adv)
1 Overview
The following information will assist in confirming if the Operator Console is suffering from hardware issues at the prescribed Field Replaceable Unit (FRU) level.
The Console Diagnostics are a collection of low-level hardware test scripts launched by a GUI menu. These tests do not offer complete functionality testing of all hardware located in the Operator Console, but do offer a suite of tests that communicate with critical functions and hardware interfaces. This suite of tests in the Console Diagnostics provides a more convenient method for executing what would have been individual command line instructions and manual review of error logs.
Failure of the tests provides a good indication that hardware faults have been detected with the associated hardware and that FRU replacement is indicated.
 |
|

It is recommended that the Operator Console be shutdown and restarted (powered on/off) before executing Console Diagnostics.
It is recommended that the Operator Console be rebooted after executing Console Diagnostics.
2 CONSOLE DIAGNOSTICS
2.1 Console Diagnostics in Common Service Desktop (CSD)
Though Console Diagnostics is listed in the navigation of the CSD, the environment necessary to execute these diagnostics requires that the applications software be terminated. Hence, Console Diagnostics cannot be launched from CSD. Instead a message is provided when selecting Console Diagnostics from the CSD instructing the user to shut down applications and perform manual entry in a terminal window to invoke the diagnostic tool.
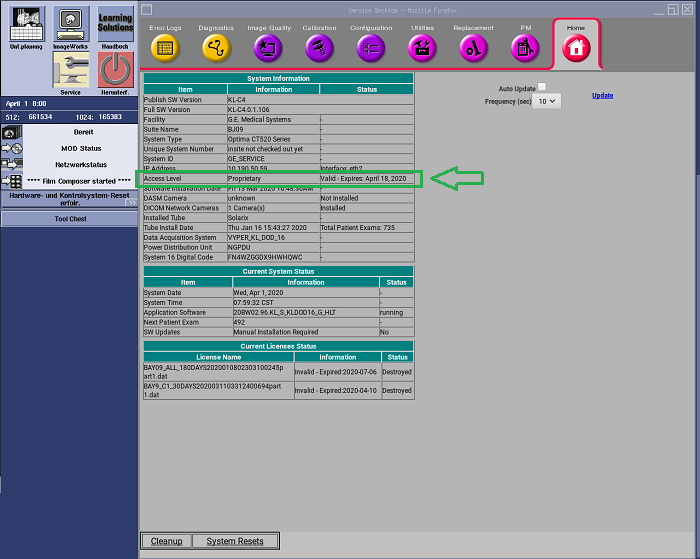
Class C proprietary software must be loaded on the system and the service key installed to perform Console Diagnostics. Check CSD Home page to Access Level status.
Figure 1. CSD Home Page Proprietary Access Status
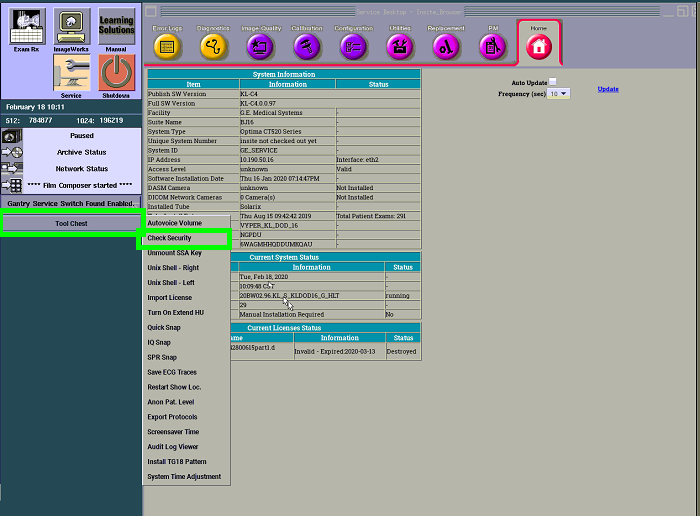
After inserting Service Key, sometimes it is necessary to check the security level of the system first, before the CSD recognizes the Service Key. Click on the Tool Chest on the desktop and select Check Security.
Figure 2. ToolChest – Check Security
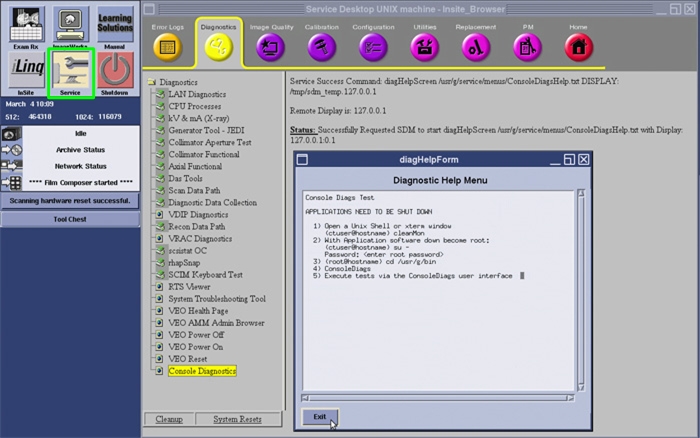
To access the Common Service Desktop, click the Service icon, then Diagnostics Tab, then Console Diagnostics menu selection. The Diagnostic Help Menu will appear, instructing the proper method for launching diagnostics.
Figure 3. Class C Common Service Desktop - Console Diagnostics - Diagnostic Help Menu
Detailed procedure for launching console diagnostics is shown in following section.
2.2 Invoking Console Diagnostics
-
Reboot the Operator Console:
-
If applications are running, reboot the system by clicking the Shutdown icon on the desktop and selecting the Restart option.
Or
-
Open a terminal window using the Toolchest:
Type: {ctuser@hostname} reboot <Enter>
-
-
Just after the Operating System finishes loading and before applications start, click Cancel in the Application Startup window to stop applications from loading.
note: Applications cannot be running when performing Console Diagnostics. -
Open a terminal window using the Toolchest:
-
Type: {ctuser@hostname} su – <Enter>
-
Type the root password and press <Enter>
-
-
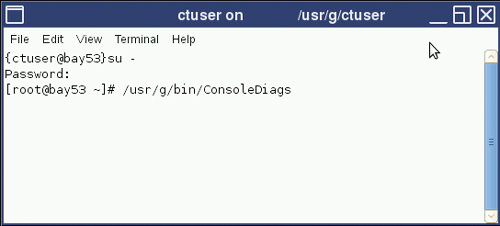
Launch the Console Diagnostics:
Type: [root@hostname ~] /usr/g/bin/ConsoleDiags <Enter>Figure 4. Terminal Window – Console Diagnostic
-
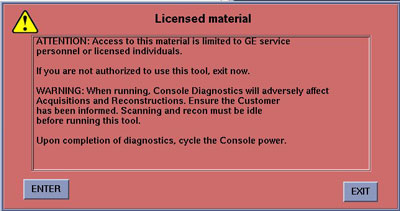
A warning pop-up box appears. Click ENTER to continue.
Figure 5. Warning Pop-Up – Console Diagnostic
-
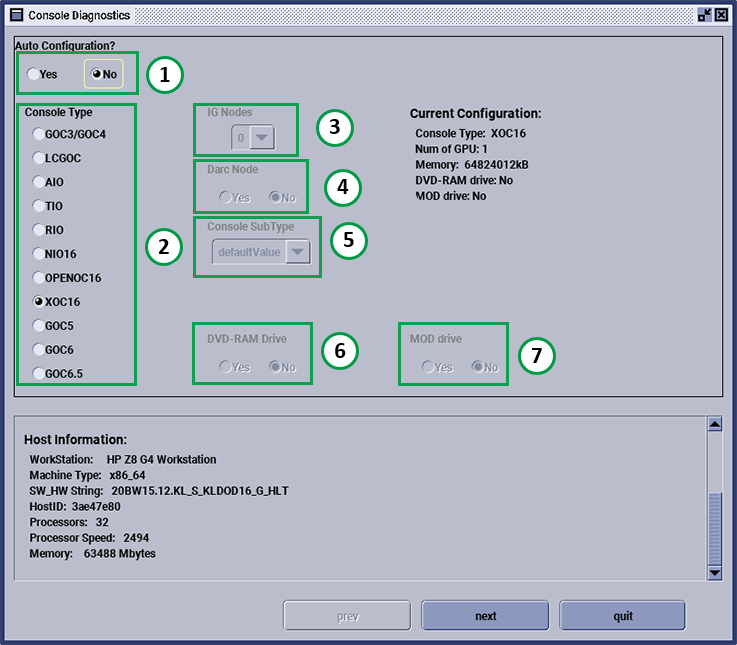
The Console Diagnostics Window - Auto-Configuration screen appears describing the Console Type presently detected and configured.
Figure 6. Console Diagnostics Window – Auto Configuration
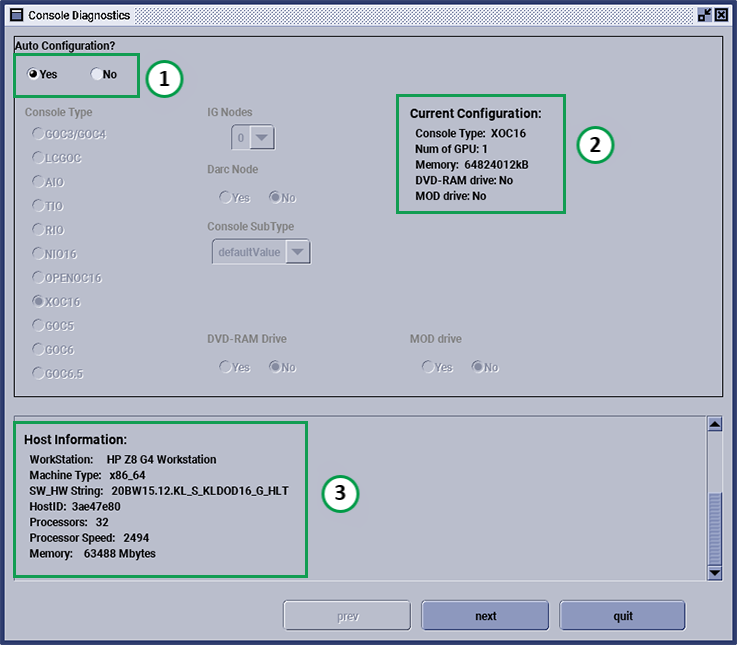 note: Additional information describing the Operator Console hardware and software present is listed in this window. This information is pulled mainly from the /usr/g/config/INFO file.
2.3 Running Console Diagnostics in Automatic Configuration Mode
-
Leave Auto Configuration selected as Yes.
-
Click next to move forward. The prev button allows the user to return to a previous screen. The quit button cancels the ConsoleDiags diagnostic script. The start over button places the user at the Auto-Configuration screen.
-
The Console Diagnostics Hardware Selection menu window appears.
Figure 7. Example Test Selection Menu Window – Console Diagnostic
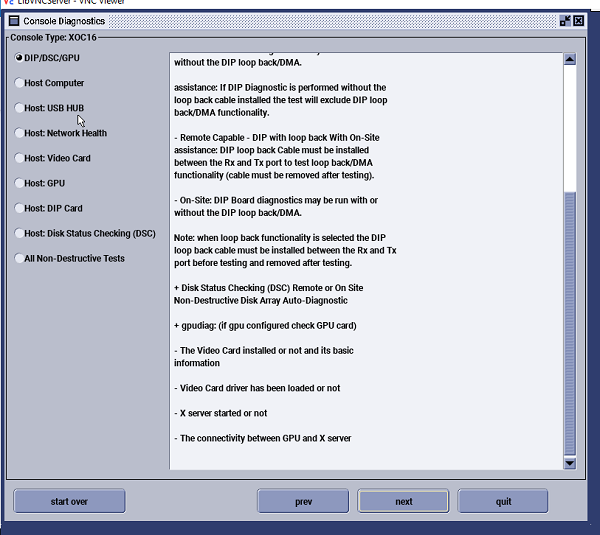 note: This graphic is an example of a Console. Actual displayed information will vary based on console type.
 -
Select the hardware to be tested by selecting the radio button next to the desired test and click next.
note: When selecting which test to run, the Hardware Selection window displays the test details of the selection to be performed. -
The next window displayed appears after every Hardware Test selection. This information is logged for future reference and may be used by OLC or Headquarter Engineers that need to speak with persons executing the Console Diagnostics.
Figure 8. FE Information Window – Console Diagnostic
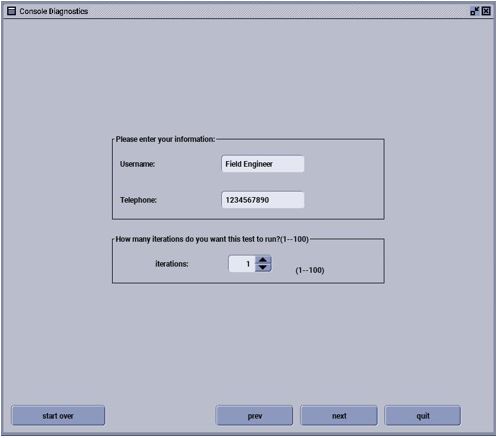 note: The Telephone Number must be numeric characters only. Do not use spaces or other characters in the field (i.e. -, /, #...etc).
 -
Enter Name and Phone Number as requested.
note: Fields in this form may be left blank. -
If desired, the selected test can be run more than once. Select the number of iterations desired and click next.
-
The Hardware Test selected previously will now be readied for execution.
note:Some of the tests require special preparation before execution: See list below.
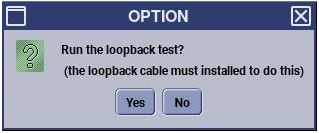
Information Pop-Up will occur before test execution.
Figure 9. Information Pop-Up – Loopback Test
-
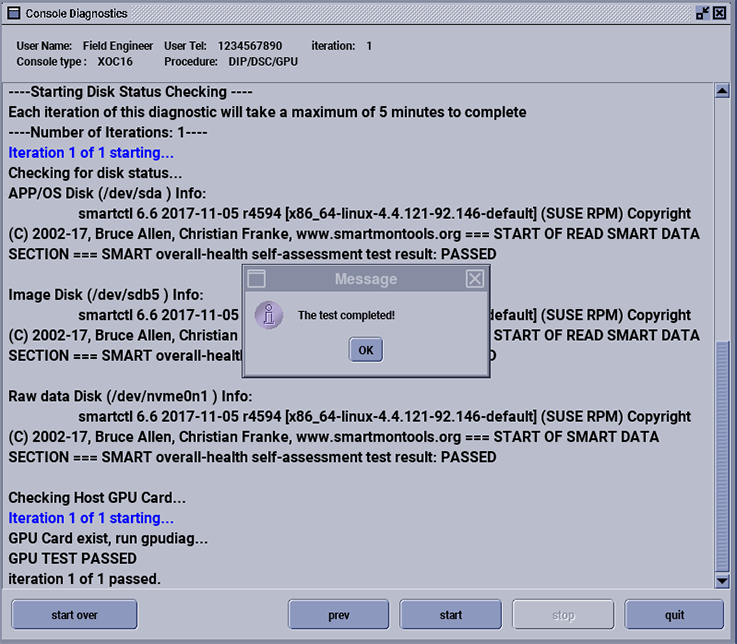
Click Start. The Results window will be displayed, Test will execute, and upon completion a Test Pass/Fail status window.
Figure 10. Example Test Execution Window – Console Diagnostic
-
Upon completion of the test, click OK in the Result Message window. Click either the prev or start over button to return to the main Hardware Test selection window.
2.4 Running Console Diagnostics in Manual Configuration Mode
 |
|
-
Change Auto Configuration selection to No.
Figure 11. Console Diagnostics Window – Manual Configuration
-
Click next to move forward. The prev button allows the user to return to a previous screen. The quit button cancels the ConsoleDiags diagnostic script. The start over button places the user at the Auto-Configuration screen.
-
For TAI X, the options are not allowed to set, click Next with default setting.
-
The rest operations and executions are same as described in the Auto Configuration Mode described above.
2.5 Console Diagnostics Menu Selection Description
The following menu selection descriptions discuss each of the hardware tests available.
3 Finalization
Upon completion of Console Diagnostics, reboot Operator Console.